How to care for your new Pleached trees | A step-by-step seasonal guide
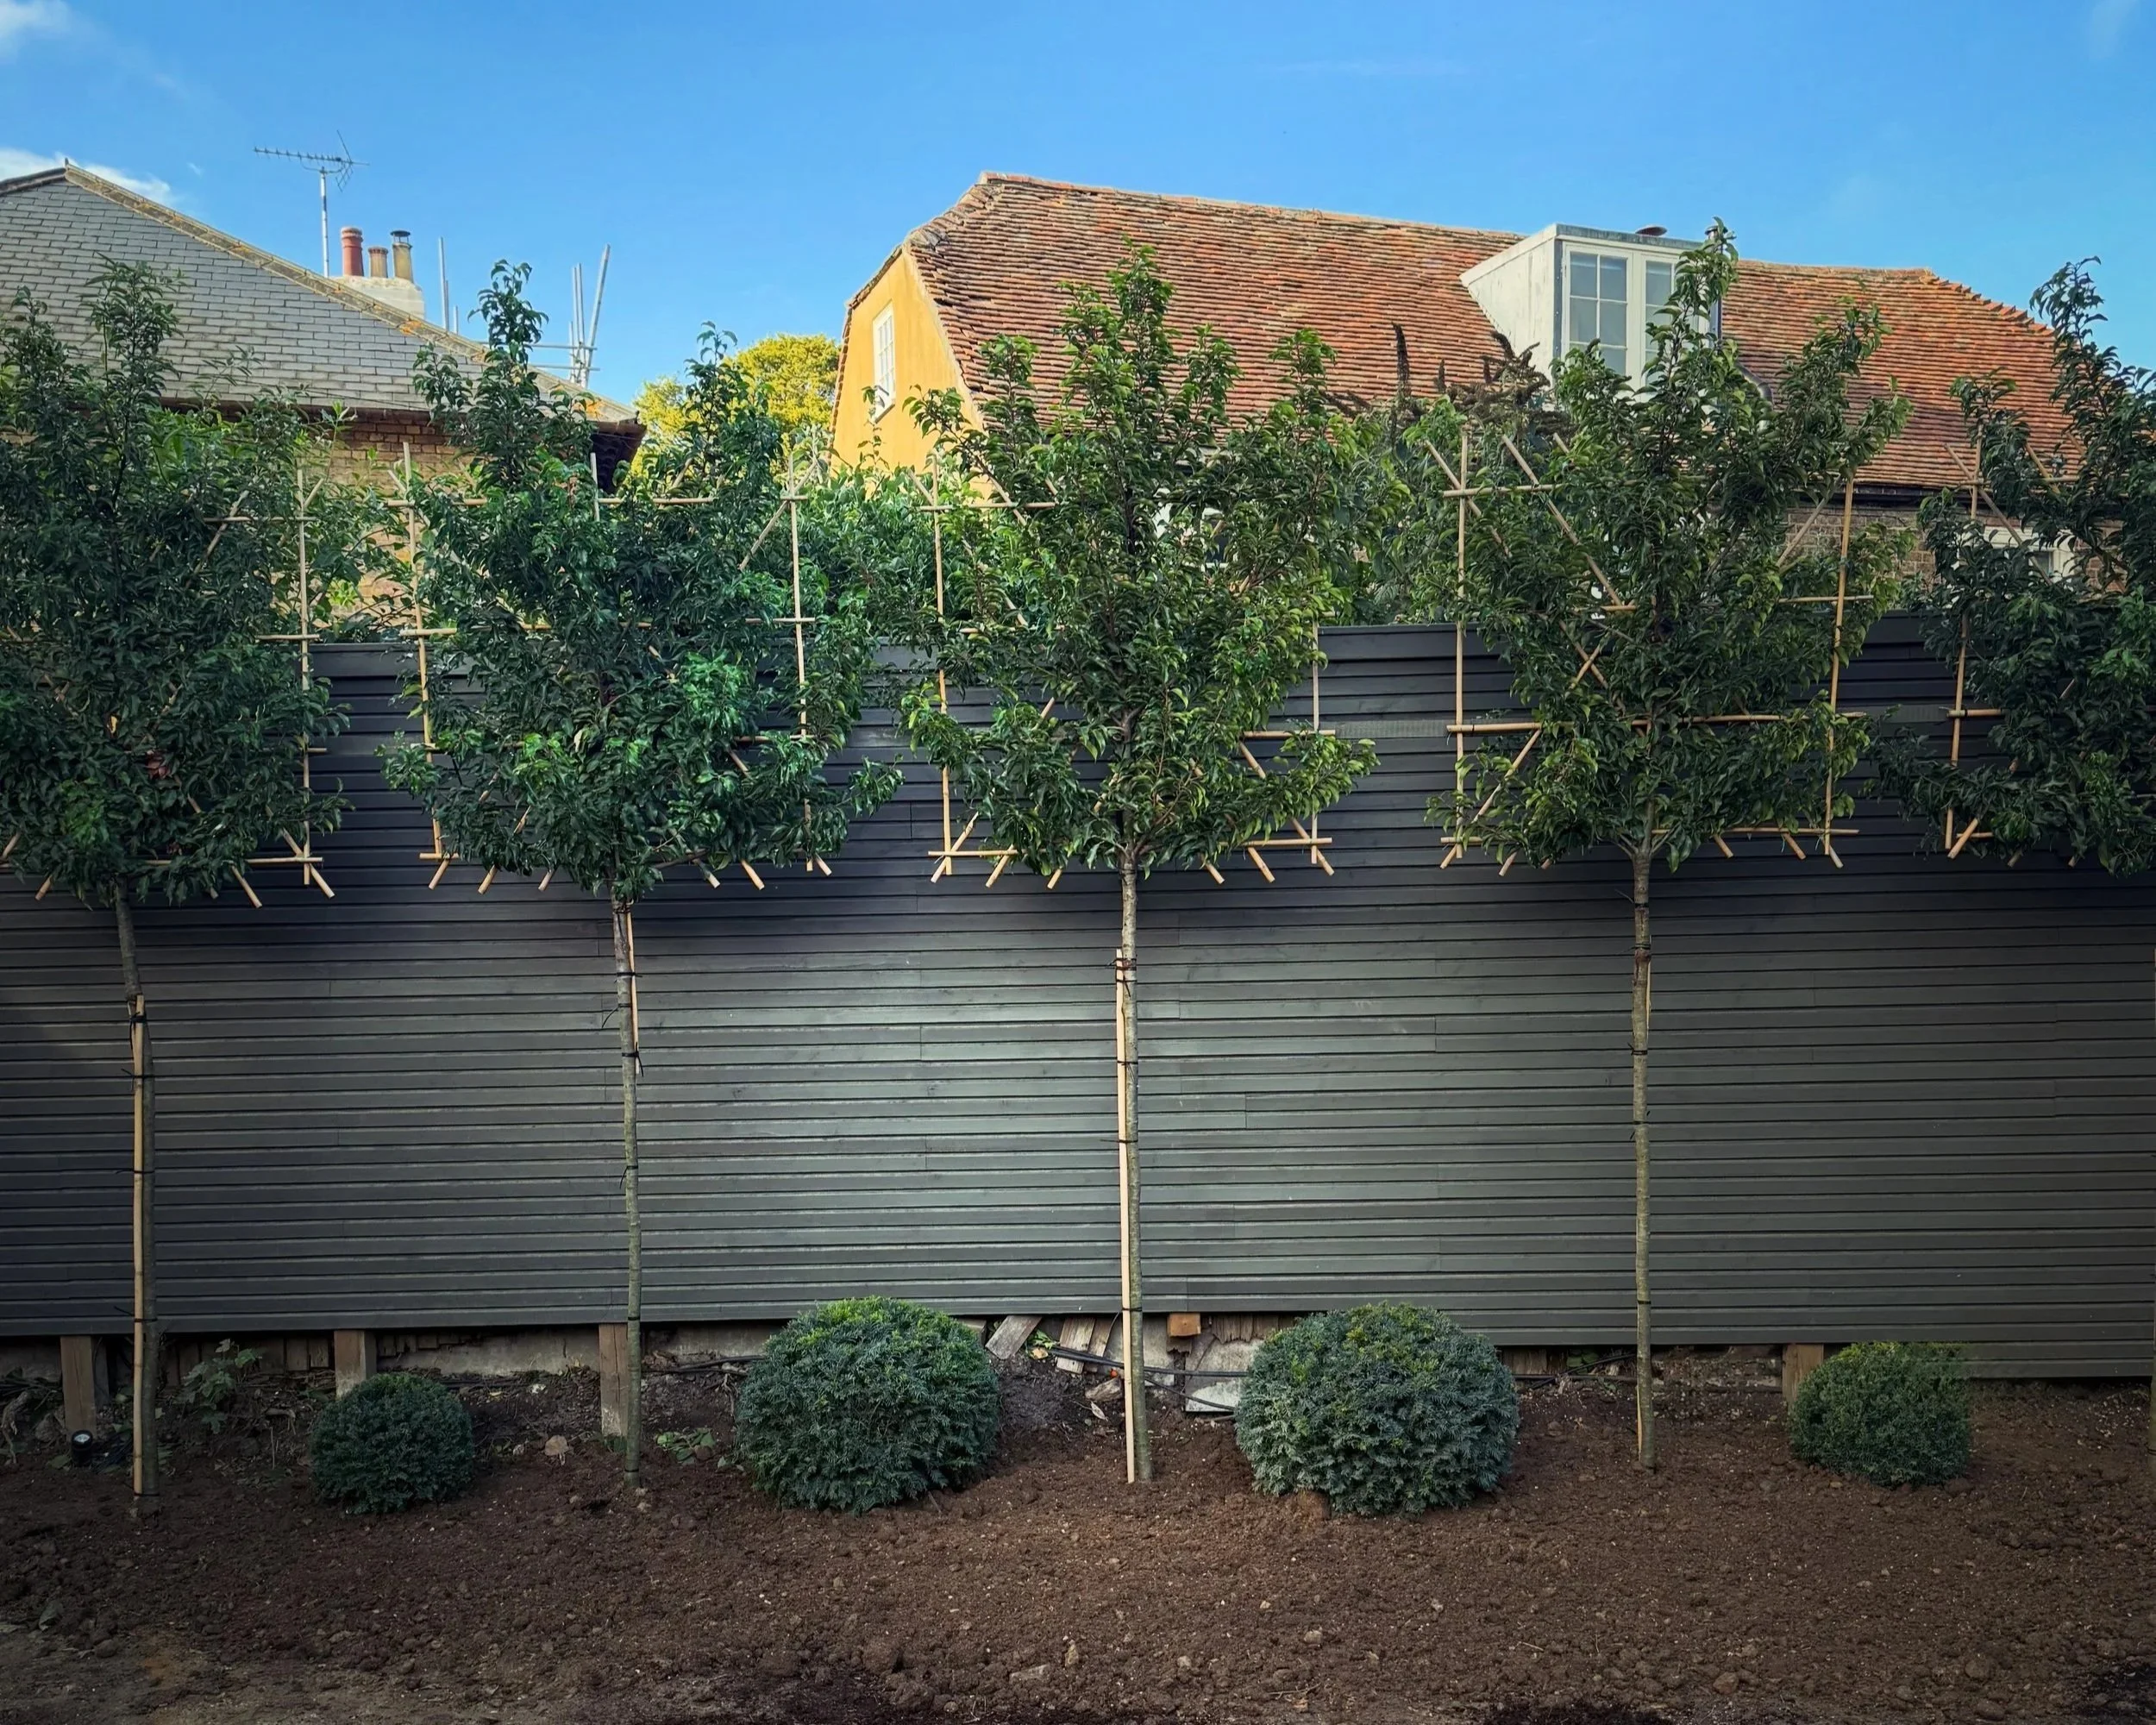
A row of Pleached Prunus lusitanica ‘Brenelia’ recently planted in a client’s garden in Deal, Kent.
Read on for a simple aftercare guide for your new Pleached trees in their first two years.
I prepared this guide for my client in Deal and thought it would also be useful advice and guidance to share online. All advice relates to the tree species Portuguese Laurel, Prunus lusitanica ‘Brenelia’
Your new pleached trees have been selected to create an elegant, evergreen screen that will provide privacy throughout the year. Over time, their branches will grow together to form a continuous green hedge above the clear trunks.
The first two years are particularly important. A drip irrigation system will help keep the trees watered while their roots establish, but they'll still need a little attention throughout the seasons.
Here's what to expect and how to look after them.
The first 6 months
The priority: Helping roots establish.
Your trees may not show much visible growth during their first 6 months. This is perfectly normal. Most of their energy will be going into establishing their root system.
What to do
Irrigation: Your drip irrigation system should be used when the soil begins to dry out. During autumn and winter, rainfall will usually provide most of the water needed, so the system can generally remain switched off unless conditions are unusually dry.
Check the soil: Every week or two, check the soil about 10–15 cm below the surface. It should feel slightly moist, never saturated. Clay soil holds moisture particularly well.
Mulching: Maintain a 5–7 cm layer of organic mulch around the base of each tree, keeping it clear of the trunk.
Stakes and ties: Check monthly that the supports are secure and the rubber ties aren't rubbing against or cutting into the trunks.
Pruning: Leave the trees largely alone for now. Only remove damaged or dead growth.
What to expect: The foliage should remain green throughout winter, although a little yellowing or leaf drop can occur as the trees adjust to their new home.
6–12 months
The priority: Encouraging new growth and beginning to connect the canopies.
As temperatures rise in spring, your trees should start producing fresh shoots. This is when the pleached screen will begin to develop.
What to do
Irrigation: Begin using the drip system as the soil starts to dry in spring. During warm, dry weather, the trees may need several watering sessions each week. The exact frequency and duration will depend on the system's water output, rainfall and soil conditions.
Check moisture: Check the soil regularly, including beneath the root ball surface, to make sure water is reaching the roots. Adjust the irrigation timer during particularly hot or wet periods.
Training: As new shoots appear, gently guide suitable flexible branches horizontally towards neighbouring trees, using the existing frames for support.
Tying: Secure branches loosely with soft garden ties, allowing room for them to thicken. Never pull branches into position if they resist bending.
Pruning: In late spring or summer, lightly trim shoots growing outwards from the front and back of the canopy. Keep useful sideways growth that will help fill gaps.
Supports: Continue checking the stakes and ties, particularly after strong coastal winds.
What to expect: Fresh growth should begin to fill out the rectangular canopies. Some branches may start reaching towards neighbouring trees, although the screen may still have visible gaps.
12–18 months
The priority: Maintaining healthy trees and protecting the new structure.
By their second winter, the trees should have developed stronger roots and a little more growth across the frames.
What to do
Irrigation: Reduce watering as temperatures fall. The system can usually be switched off through winter, but check soil moisture during prolonged dry spells. Drain or protect exposed irrigation components against freezing.
Training: Check that previously tied branches aren't becoming restricted as they thicken. Loosen or replace ties where necessary.
Pruning: Avoid major pruning during winter. Remove dead, damaged or diseased growth as necessary.
Frames: Leave the training frames in place while the branches are still developing their shape.
Stakes: Check that all supports remain secure and aren't damaging the bark.
What to expect: The trees should be settling into their new surroundings. Some gaps between the canopies may remain, which is quite normal.
18–24 months
The priority: Developing a fuller, continuous evergreen screen.
During their second growing season, the trees should become noticeably more established and produce stronger new growth.
What to do
Irrigation: Resume watering as required in spring. The trees may need less frequent watering than in their first summer, but continue using the system during extended dry periods. Check soil moisture rather than relying entirely on the timer.
Training: Guide new horizontal shoots towards neighbouring canopies. Where branches meet, gently overlap or weave flexible growth together to encourage a continuous screen.
Pruning: Lightly clip the front, back and top of the canopy in late spring or summer to encourage denser growth. Avoid cutting away useful horizontal branches before the gaps have filled.
Frames: Assess whether the branches are strong enough to hold their trained shape without the temporary frames. Don't remove them simply because two years have passed.
Stakes: Check whether the trees are firmly rooted and can support themselves without movement at the base. If so, the stakes may be ready for removal.
What to expect: By the end of year two, you should have a fuller, more connected screen. The time taken to achieve a completely dense hedge will depend on growing conditions and the spacing between the trees.
Looking after your drip irrigation system
Your irrigation system will make caring for the trees considerably easier, particularly during their first two summers.
A few simple checks will help ensure it works properly.
Spring: Turn the system on, inspect the pipework and emitters for leaks or blockages, and check that water is reaching each tree's rootball.
Summer: Adjust the timer according to the weather. Hot, dry periods may require more frequent watering, while prolonged rainfall should mean reducing or pausing the system.
Autumn: Gradually reduce watering as temperatures fall and rainfall increases.
Winter: Switch off the system when watering is unnecessary and protect vulnerable components from frost.
Important: Drip irrigation should provide a thorough watering followed by time for the soil to drain. Avoid running it for short periods every day simply to keep the surface damp.
Once a month during the growing season, check the soil around each tree to make sure the system is delivering water evenly. If the ground feels constantly wet, reduce the watering.
How to train the branches together
Once the trees begin producing fresh growth, the aim is to encourage their branches to grow sideways and connect with those of their neighbours.
Choose a young, flexible shoot growing towards the next tree.
Guide it horizontally along the existing frame or towards a neighbouring branch.
Tie it loosely using soft, flexible garden ties.
Overlap or gently weave suitable shoots from neighbouring trees as they grow together. Avoid forcing or tightly twisting branches.
Keep checking the ties and adjust them as the branches thicken.
Over time, these branches will develop into a continuous canopy. They don't need to be physically joined or grafted together. The aim is to create overlapping foliage that forms a dense, attractive screen.
When can the frames and stakes be removed?
The training frames
These help maintain the rectangular shape while the branches are developing.
They can usually be removed once the canopy has formed a strong, self-supporting structure. This may be after two to three years, or longer, depending on growth and the type of frame supplied.
Don't rush to remove them. If the frame is still needed to support the branches, leave it in place and continue checking the ties.
The supporting stakes
These are separate from the training frames. They stabilise the whole tree while the roots establish.
Stakes are commonly needed for around two growing seasons, although exposed sites and larger trees may need support for longer.
Once the root system is sufficiently established and the tree can stand securely without support, the stakes and ties should be removed.
Ideally, arrange for your garden designer or tree specialist to check both the frames and stakes before removal.
It’s worth noting, I didn’t use standard stakes at my project in Deal (in the picture above). The fence directly behind the trees is high, so we were able to fix a wooden brace to this, and then fasten the frames of the tress directly to it. I painted the wooden brace in the same dark green as the fence, to essentially make it invisible.
Your simple seasonal checklist:
Spring
Restart irrigation as needed, check emitters, train new shoots and refresh mulch
Summer
Adjust irrigation for the weather, check soil moisture, guide branches and lightly prune
Autumn
Reduce irrigation, check ties and supports, tidy damaged growth
Winter
Switch off irrigation when unnecessary, protect pipework from frost and check for wind damage
Five important things to remember
Let the irrigation do the watering, but check the soil. The timer is a guide, not a substitute for checking moisture.
Keep the roots mulched. This helps retain moisture and protects the soil.
Train sideways growth. These branches will eventually connect the trees into one continuous screen.
Check ties regularly. They must never become tight enough to damage the branches or trunks.
Be patient. The trees will gradually become fuller and more beautiful as they establish.